Introduction
The Google OAuth playground is a great way to test the integration with Google services using the various Google APIs. The OAuth playground focusses on those APIs that use OAuth as an authentication mechanism. In this post, I'll be showing you how to interact with the Google Buzz API from the OAuth playground. |
OAuth is not the easiest thing to test on a standalone or isolated environment, as it requires human interaction, popping a browser, and getting an access token from the browser to your application. (something that's rather problematic and difficult for most desktop / mobile applications).
So if you're developing an application, and you want to focus on the actual API (request/response interaction with Google), handing off the OAuth part to the OAuth playground can be a helpfull thing.
The process is really simple, and in 2 minutes time, you'll be able to retrieve your Google Buzz Feed using the API, and post a message to Google Buzz.
Google OAuth Playground page
OK, let's get things started. First, direct your browser to the Google OAuth Playground page. You'll notice the site is divided into 6 distinct zones:
- Choose your scope
- Modify the OAuth Parameters
- Get a Request Token
- Authorize the Request Token
- Upgrade to an Access Token
- Use the token
Choose your scope
The first thing we'll do is pick a scope for our OAuth interaction. In this particular case, we'll choose the Google Buzz scope.
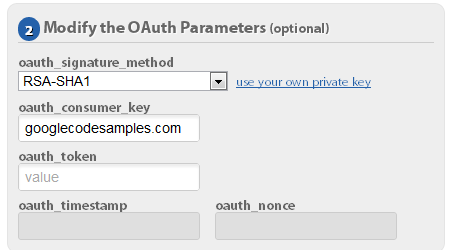
There's no need to modify the OAuth Parameters for the Google Buzz scope.
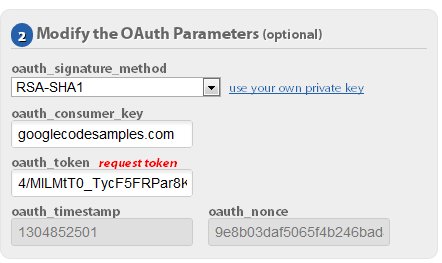
Retrieve the Request Token
We start the OAuth flow by clicking on the Request Token button.
As you can see in zone 2, a Request Token (oauth_token) was provided to us. This was done without user intervention by doing a call to Google. We need this request token for the next steps.
Authorize the Request Token
Now that we have a request token, we need to authorize the request token. In order to authorize the request token, user interaction is required. Click the Authorize button, and you'll notice that a new brwoser window is popped, asking you to authorize access to your Google Buzz. This is the point where the user needs to decide if he wants to give the third party access to your Google Buzz. The third party in this case the Google OAuth playground, but imagine your application being mentioned ont his page.
After you've given access, your Request Token becomes authorized, and we can continue with the OAuth flow.

Upgrade the Authorized Token to an Access Token
Our authorized access token needs to be "upgraded" to an Access Token. This is done without human intervention, simply by perform a call to Google with the authorized request token from the previous step.The Access Token is required in order to interact with the Google services.

Finally, we can start interacting with our service.The Google OAuth playground allows for an easy way to send requests to the services, and view the responses coming back. This is done in section 6 - Use the token. At this point, it's time to consult the Google Buzz API documentation.
Retrieving the public Buzz feed
One of the first things we'll do is retrieve the public feed of our user. This is done by putting the following URL into the feed URI field :https://www.googleapis.com/buzz/v1/activities/@me/@public

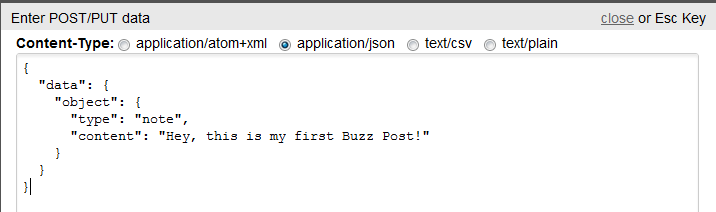
Add a Buzz post
In order to add a Buzz post, we need to do a POST (as opposed to a GET earlier), and enter some post data. The post data is a JSON string that represents our Buzz post.{
"data": {
"object": {
"type": "note",
"content": "Hey, this is my first Buzz Post!"
}
}
}
After executing our POST, check your Google Buzz to see that the post was created succesfully.

Nice writeup, thanks for sharing!
ReplyDeletehelps a lot! There is a suggestion that when selecting the method such as get or post , it is better show the whole usage !
ReplyDelete