Introduction
In this article, I'm going to discuss OAuth 2.0 and the Latitude API. A couple of days ago, OAuth 2.0 support was announced for the Latitude API, and I figured it might be a good idea to take a more in-depth look on how OAuth 2.0 can be used with the Latitude API and how theGoogle APIs Client Library for Java implemented the Oauth 2.0 spec.
The article is accompanied by a sample application on Github. It's heavily inspired by existing samples for Google APIs Client Library for Java. In order to run the sample, clone the Git repo, import the project in Eclipse, fill in the Oauth constants (see subsequent section) and run the LatitudeSample class. In order to resolve the project dependencies, it's advised to use the Maven2 plugin for Eclipse.
The goal here is to start executing requests on the Latitude API, secured via OAuth 2.0. For this, we'll use a simple command line application. For the same flow using the Latitude API on the Android platform, checkout Oauth 2.0 flow in Android
Project setup
First, we need to have a look at our project setup. The project has various dependencies that are defined in the maven2 pom. I've made the code available in such a way that it can be directly imported in Eclipse.Providing you've installed the maven2 plugin for Eclipse, the plugin will automatically start downloading all dependencies required in order for you to run this project from the IDE.
In short, the following maven2 dependencies are required :
Including the transitive dependencies, following is a list of all the libraries you'll need to run it. (as stated before, I highly recommend you using the maven2 plugin for eclipse in order to resolve these dependencies. It will get you up and running really fast).com.google.api.client google-api-client-googleapis 1.4.1-beta com.google.api.client google-api-client 1.4.1-beta com.google.api.services.latitude google-api-services-latitude-v1 1.1.0-beta org.mortbay.jetty jetty 6.1.26
M2_REPO/commons-codec/commons-codec/1.3/commons-codec-1.3.jar
M2_REPO/commons-logging/commons-logging/1.1.1/commons-logging-1.1.1.jar
M2_REPO/com/google/api/client/google-api-client/1.4.1-beta/google-api-client-1.4.1-beta.jar
M2_REPO/com/google/api/client/google-api-client-googleapis/1.4.1-beta/google-api-client-googleapis-1.4.1-beta.jar
M2_REPO/com/google/api/services/latitude/google-api-services-latitude-v1/1.1.0-beta/google-api-services-latitude-v1-1.1.0-beta.jar
M2_REPO/com/google/code/gson/gson/1.6/gson-1.6.jar
M2_REPO/com/google/guava/guava/r09/guava-r09.jar
M2_REPO/org/apache/httpcomponents/httpclient/4.0.3/httpclient-4.0.3.jar
M2_REPO/org/apache/httpcomponents/httpcore/4.0.1/httpcore-4.0.1.jar
M2_REPO/org/codehaus/jackson/jackson-core-asl/1.6.7/jackson-core-asl-1.6.7.jar
M2_REPO/org/mortbay/jetty/jetty-util/6.1.26/jetty-util-6.1.26.jar
M2_REPO/org/mortbay/jetty/jetty/6.1.26/jetty-6.1.26.jar
M2_REPO/com/google/code/findbugs/jsr305/1.3.9/jsr305-1.3.9.jar/>
M2_REPO/junit/junit/4.8.2/junit-4.8.2.jar
M2_REPO/org/mortbay/jetty/servlet-api/2.5-20081211/servlet-api-2.5-20081211.jar
M2_REPO/xpp3/xpp3/1.1.4c/xpp3-1.1.4c.jar
If all went well, you should see the following in your Eclipse:

OAuth 2 setup
Before you can run the application, you'll need to get a hold of an OAuth client ID, and an API key for Google Latitude. Both things can be retrieved from the Google API console. The Google API console allows you to define one or more projects. Create a project, and make sure that for "Latitude API", the status switch is flipped to the "ON" position.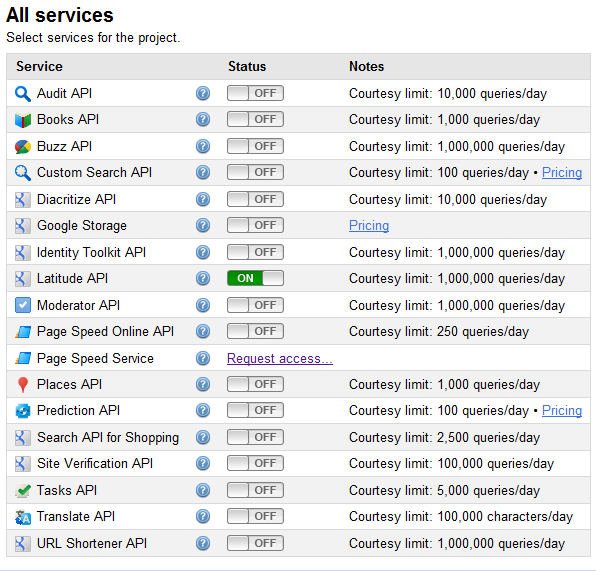
Next, click on "API Access". You should see the following screen :

Click on "Create an OAuth 2.0 Client ID...". Choose a product name, and optionally load up an image and click "Next". (the product name and image will be shown to the user when your application is requesting him to authorize access).

Make sure you select "Installed application" and click "Create client ID".

You should see the following summary
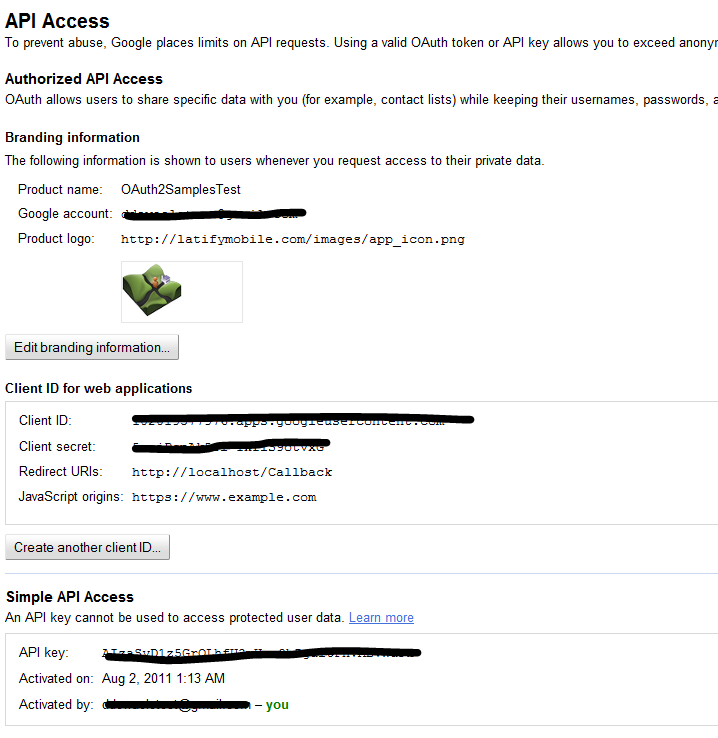
This summary contains 2 important items
- The OAuth Client ID / Secret
- The API key
You need the Oauth Client ID to setup your Oauth 2.0 communication. The API key is used to track the Latitude API usage in the console when clicking on the Reports link.
The sample code contains a OAuth2ClientCredentials class where these constants can be defined.

OAuth 2.0 web flow
The OAuth 2.0 web based flow that we'll be using to authorize our API calls requires 2 important things :- a user interacting with the browser to authorize access to a certain API (in this case Latitude).
- our application capturing the response once the user authorized the request. (to capture the code)
Subsequent calls to the API can re-use this access token. Although the access token is short-lived (expires after 1 hour), it needs to be "refreshed" using a refresh token. Luckily for us, the google api client for java does the refreshing for us.
When starting the application for the first time, we obviously don't have an access token yet.
We need to pop a browser from our command line. There are very few real-world use-cases that would work this way (popping a browser from a command line), but it's done to explain the mechanics of OAuth 2.0.
I'll post a sample soon on how this can be done from a web application or an android application.
Letting the user authorize access
The user does so through a web page provided by Google. Our application needs to redirect the user to an authorization URL that can be generated using theString authorizationUrl =
new GoogleAuthorizationRequestUrl(clientId, redirectUrl, scope).build();
The generated URL that looks like this:https://accounts.google.com/o/oauth2/auth?client_id=1021231231376.apps.googleusercontent.com&redirect_uri=http://localhost:51871/Callback&response_type=code&scope=https://www.googleapis.com/auth/latitude.all.best
The page looks like this:

The sample application will launch a browser displaying that page, and will wait untill the user authorizes acces. (For more details on how this is done, check the exchangeCodeForAccessToken method in the OAuth2Native class).
As you can see, it contains the following parameters
client_id
The client ID as found on the Google API Console
redirect_uri
A URL where Google will redirect us to after the user has authorized access
response_type
scope
The scope that we want to use for our API calls. As we're using Latitude, we use the new OAuth 2.0 scopes defined by the Latitude API.
When the user authorizes access, a code is sent as a request parameter in the redirect URI that we've specified. As our sample application has launched an embedded Jetty running on our localhost, we can capture the code in the request parameter.
Once we've captured thus code, we can now go and initialize a GoogleAuthorizationCodeGrant (Google extension to the OAuth 2.0 Web Server Flow), to exchange this code for an actual access token, required to perform API calls.
When the GoogleAuthorizationCodeGrant is executed, it returns an AccessTokenResponse, where our OAuth 2.0 access token (and refresh token) is encapsulated.
(Internally, the GoogleAuthorizationCodeGrant will go on to request the actual access token by executing a HTTP POST to https://accounts.google.com/o/oauth2/token)
The API takes care of processing the response, and returning it as an AccessTokenResponse object.
Typical usage of the code looks like this :
GoogleAuthorizationCodeGrant request =
            new GoogleAuthorizationCodeGrant(new NetHttpTransport(),
                new JacksonFactory(),
                "s6BhdRkqt3",
                "gX1fBat3bV",
                "i1WsRn1uB1",
                "https://client.example.com/cb");
        AccessTokenResponse response = request.execute();
        System.out.println("Access token: " + response.accessToken);
An accessTokenResponse looks like this :
{access_token=1/BlrDfsdfsdfsdfsdfTpnbWz_9dqEZyPZ-g2jM, expires_in=3600, refresh_token=1/D36E7QYxLWpnsdfsfsdf1MM2lgRTpxYxlmw, token_type=Bearer}
Keep in mind that once you've retrieved an access token, you can store it somewhere safely in your application. You obviously don't want to have the user authorize each and every individual API call. The sample application is shipped with a very simple FileBasedCredentialStore, storing the access token data in a file on the filesystem, and reading it from there when required.
A file called latitude-accesstoken will be stored in your temp folder, containing the access token, expiration and refresh token.:
1/Hdbvdb7ydsfsdfdfZw2zFLRfeYCxr2zuSuc
3600
1/PjzuhTEyu6sdfdsfsdfI1fafW_QE6PqeVWlBw
Once an access token is retrieved, we can re-use it, and start creating a GoogleAccessProtectedResource.
return new GoogleAccessProtectedResource(response.accessToken,
        transport,
        jsonFactory,
        clientId,
        clientSecret,
        response.refreshToken)
the GoogleAccessProtectedResource is a key component here, as this is what we'll use to initialize the Latitude service. This is actually a requestInitializer, a part of the Google APIs Client Library for Java, and used

The Latitude Service definition
Up until now, we've only covered the OAuth 2.0 part. Rest assured, we have the most complex part out of the way now, and assuming we have succesfully retrieved an access token, we can start using the Latityde API.Google APIs Client Library for Java offers a client library for the Latitude API. It contains the Latitude model classes, as well as the bulk of the plumbing code to perform Latitude API calls.
A central component in the Latitude API is the Latitude service definition, represented by the Latitude object. The Latitude object is initialized like this;
final Latitude latitude = new Latitude(transport, accessProtectedResource, jsonFactory);
As you can see, the Latitude service definition is initialized with:
transport
The HTTP transport used to perform the REST calls.
accessProtectedResource
See previous section. Available after having retrieved the access token. Encapsulates all the OAuth2.0 stuff, required for authorized access to the Latitude API
jsonFactory
Factory required to parse the JSON based HTTP responses
The Latitude service definition also has other properties you can configure.
latitude.apiKey="AsdfdsfsdfdftFhVABVWuFk";
latitude.setApplicationName("Google-LatitudeSample/1.0");
latitude.prettyPrint = true;
The Latitude service definition encapsulates all Latitude specific stuff like the endpoint (https://www.googleapis.com/latitude/v1/) and the various operations on the service.
Now that our service definition is properly setup, we can use it to make the actual API calls
Performing API calls
The Latitude service definition exposes various operations (currentLocation and location). On each of these operations, RemoteRequests are defined (Get / Delete / Insert).
On the service definition, we get a reference to the operation (currentlocation), and then get a reference to the RemoteRequest (Get).
First, we're going to retrieve the current location of the user.
Retrieving the current location
To show the current location, we execute the following method :static void showCurrentLocation(Latitude latitude) throws IOException {
View.header("Show CurrentLocation ");
LatitudeCurrentlocationResourceJson latitudeCurrentlocationResourceJson = latitude.currentLocation.get().execute();
View.display(latitudeCurrentlocationResourceJson);
}
[insert image]
The Latify service definition does an excellent job of encapsulating
- building the lower level HTTP requests.
- constructing the base URLs, makes sure our API key is properly appended
- authenticating our request.
- executing the HTTP calles
- handling responses
All it takes is one simple line of code to retrieve the current location.
Updating the current location
Updating your location is equally simple :
static void updateCurrentLocation(Latitude latitude) throws IOException {
  View.header("Show CurrentLocation ");
  LatitudeCurrentlocationResourceJson latitudeCurrentlocationResourceJson = new LatitudeCurrentlocationResourceJson();
  latitudeCurrentlocationResourceJson.put("latitude", "32.40");
  latitudeCurrentlocationResourceJson.put("longitude", "12.40");
  LatitudeCurrentlocationResourceJson response = latitude.currentLocation
    .insert(latitudeCurrentlocationResourceJson).execute();
  View.display(response);
 }
Showing location history
As is showing your location history
static void showLocationHistory(Latitude latitude) throws IOException {
  View.header("Show CurrentLocation ");
  com.google.api.services.latitude.Latitude.Location.List list = latitude.location.list();
  list.maxResults = "10";
  LocationFeed locationFeed = list.execute();
  List locations = locationFeed.items;
  for (Location location : locations) {
   View.display(location);
  }
 }
when it is about to execute the HTTP GET request for retrieving the current location, the Latitude service definition will intercept that call, and make sure the OAuth token is properly added to the HTTP authorization header.
Conclusions
It's nice to see that the Latitude API starts supporting OAuth 2.0. It was a popular feature request and it's great to see that Google delivered. Although OAuth 2.0 is less complex when compared to OAuth 1.0, it does require you to have a basic knowledge of OAuth, and the various steps in the OAuth flow.Luckily, many client APIs have OAuth 2.0 support built-in, making it more easy for developers to write third party applications, focussing on business logic, and not worrying about the lower-level plumbing.
It's still unclear how platforms like Android will deal with OAuth 2.0. Android developers can off course do the standard web based flow like we outlined here, but I always felt it was one of the shortcomings of Oauth 1.0, and having the user leave your application to push a button on a web-page doesn't make for a very user-friendly experience. There were plans to hook up the Android AccountManager with OAuth 2.0, but I didn't manage to get this up & running with the Latitude API (It did work when using Google Buzz / Tasks API).
Ohhh Wow! This is too much things to do, I feel headache seeing the codes. I will try to understand it little by little, Thanks for sharing this! Very helpful for me.
ReplyDeleteLora from lisseur cheveux